Writingway got a number of updates since I last posted about it here, so I figured I’d write a completely new post about it. It’s noteworthy that Writingway is a work in progress, will get updates every so often, so it’s worth it to check for updates from time to time. There are features I’d love to get in, like some sort of configurable stats page similar to something like Grammarly / ProWritingAid, but that’s down the road. In this blog post, let’s focus on the features it has right now.
Important Note: As I’m writing this (March 9th, 2025), you need to install faiss-cpu and tiktoken manually. Press WIN+R, type cmd. In the new window type pip install tiktoken and let it install, then pip install faiss-cpu. These two modules are needed for the Workshop chat. This will be simplified in later versions. All other dependencies should be installed by double-clicking the start.bat.
1. Project Organization
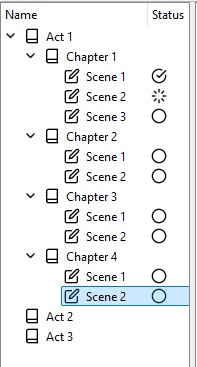
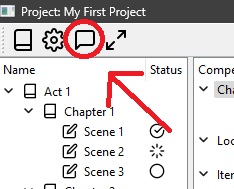
Hierarchical Story Structure: The program uses a project tree to organize your novel into Acts, Chapters, and Scenes. This tree appears on the left side of the main window and serves as an outline of your story. You can expand/collapse acts to see their chapters, and expand chapters to view individual scenes. Clicking a scene in the tree opens its content in the editor for writing
- Adding Acts, Chapters, and Scenes: You can add new sections to your project via a right-click context menu in the project tree. Right-click in an empty area of the tree (or on the project root) to add a new Act. Right-click an Act to add a Chapter, or right-click a Chapter to add a Scene. A dialog will prompt you to name the new act/chapter/scene, and it will then appear in the tree under the appropriate parent. Acts and Chapters can have a summary (brief description) in place of content, while Scenes hold the actual story text.
- Renaming and Reordering: To rename any item (Act, Chapter, or Scene), right-click it and choose Rename, then enter the new title. You can reorganize the order of items at the same level by right-clicking and selecting Move Up or Move Down. This will shift the selected act/chapter/scene up or down in the tree hierarchy. These changes are immediately reflected in the project structure and saved to your project file.
- Deleting Sections: If you need to remove a section, right-click the item and choose Delete. The item will be removed from the tree (along with any sub-items it contains, so deleting an Act deletes its chapters/scenes). The project file updates accordingly to forget that item.
- Scene Status Tracking: Scenes can be marked with a status to track your writing progress. When you right-click a scene (a third-level item in the tree), you’ll see a “Set Scene Status” submenu with options like To Do, In Progress, and Final Draft. Selecting a status will tag the scene accordingly (often updating an icon or label in the “Status” column next to the scene’s name). This helps you see which scenes are still drafts and which are complete. The project tree has two columns – “Name” and “Status” – so you can glance at progress while organizing your work.
Using the Project Tree: The project tree is your navigator and manager for the whole manuscript. You can expand/collapse nodes to manage big picture structure, and select any scene to jump to writing that part. The tree’s context menu (right-click) is your primary way to add or manage sections, making it easy to restructure your novel as it evolves. All changes (new sections, renames, deletions) are automatically saved to the project file, so your outline is persisted between sessions.
2. Compendium & Contextual Writing
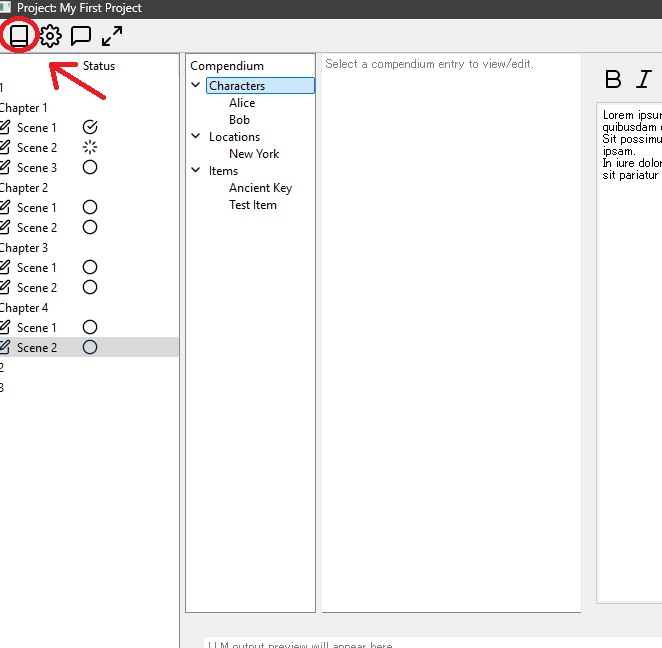
Worldbuilding Compendium: The program includes a Compendium panel to store world-building details, reference notes, and background information for your story. Think of it as a mini-database or encyclopaedia of your fictional world, organized by categories and entries. You can toggle the Compendium panel from the main toolbar (click the book icon to show/hide it). When open, it appears (usually on the right side or as a split panel) with a list of categories and entries on the left, and an editor on the right to view or edit the details of a selected entry.
- Categories and Entries: Compendium data is organized into Categories (like Characters, Locations, Magic System, etc.) each containing multiple Entries. In the Compendium tree view, categories are top-level nodes, and entries are child items. Selecting an entry displays its content (the notes or description you wrote for that entry) in the text editor next to the tree. For example, you might have a category “Characters” with entries for each major character, each entry containing that character’s biography, traits, and backstory.
- Adding and Managing Entries: To create a new compendium entry, right-click on a category and choose “New Entry”. A new entry will appear under that category (with a placeholder name like “New Entry” which you can rename). You can then type details about that entry in the editor on the right. The compendium editor supports rich text input for flexibility in note-taking. After editing an entry, remember to save it: right-click the entry and choose “Save Entry” to commit your changes to the compendium file. (If you switch entries or close the program without saving, you may lose unsaved compendium edits.)
- Renaming and Deleting Entries/Categories: You can rename a category or entry by right-clicking it and selecting Rename. For categories, you’ll be prompted for the new category name; for entries, the new title will update in the tree. To delete an entry or an entire category, right-click it and choose Delete. Deleting a category will remove all entries under it, so use caution. The compendium data is saved to a JSON file on disk automatically whenever you add, rename, move, or delete entries/categories.
- Organizing Entries: The compendium also allows reorganization. You can drag-and-drop entries between categories or use the context menu: for an entry, “Move To…” lets you transfer it to a different category. Additionally, similar to the project tree, Move Up / Move Down options are available on right-click to reorder entries within a category or to reorder the categories themselves. This helps keep your worldbuilding notes logically organized (e.g., arranging character entries alphabetically or by importance).
- Contextual Writing with the Compendium: The compendium isn’t just a static reference – it’s integrated into your writing workflow to provide context to the AI and to you as the author.
- In-Editor Context: As you write scenes, you can quickly reference compendium info (like a character’s profile or a location description) without leaving the program. Simply open the compendium panel alongside your editor and navigate to the needed entry. This way, all your notes are at your fingertips, reducing the need to recall details from memory.
- AI Prompt Integration: When using AI features (like the workshop chat or prose generation), the program can include relevant compendium entries to ground the AI’s responses in your story’s details. For example, the AI assistant might automatically pull in a character’s notes or important setting information from the compendium to avoid contradictions. The Workshop chat interface even has a Context Panel (toggled by the book icon in the chat window) that shows the project’s structure and compendium side by side. You can use it to select which pieces of lore or which previous scenes to feed into the AI’s prompt, ensuring the AI has the right context when generating text. The system can parse references to compendium entries in your messages and replace them with the actual content from your worldbuilding database, which helps maintain consistency and richness in the AI’s output.

In short, the Compendium acts as your world’s knowledge base, and the program allows you to seamlessly weave this background information into the writing process – both for your own reference and to inform the AI-driven writing tools.
3. Writing Environment
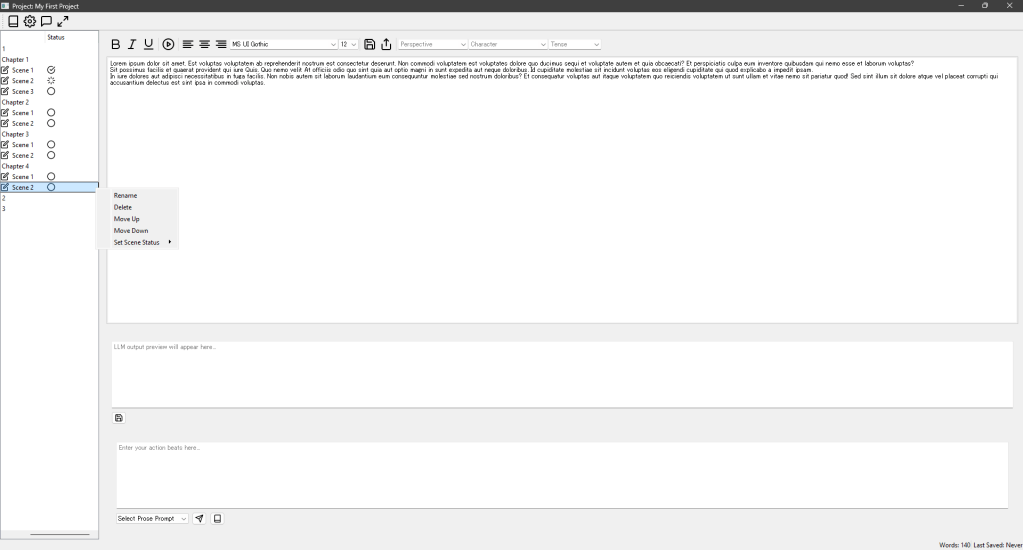
Main Editor for Scenes: The core writing happens in the main editor, a rich text area occupying the central part of the window (to the right of the project tree). When you select a scene in the project tree, its content loads into this editor for you to write and edit. If you select an Act or Chapter instead, the editor will show a summary field for that section (prompting you to “Enter summary…” rather than scene text). This lets you jot down overviews for larger sections or write the actual narrative for scenes.
- Text Formatting Options: A formatting toolbar is provided above the editor to style your text as needed. You have standard rich-text controls: Bold, Italic, Underline buttons to emphasize text, and alignment options (Align Left, Center, Right) to format paragraphs. There’s also a Font selector and Font size dropdown, so you can change the typeface and size while writing. These controls apply to the selected text or the current typing cursor position in the editor. For example, to italicize a word, you can highlight it and click the Italic button (or use the Ctrl+I shortcut). The editor supports basic formatting, which can make your draft easier to read or mark sections that need attention. Keep in mind that these formatting tools are mainly for your convenience during drafting; if you export or use the text elsewhere, you might need to ensure the formatting carries over or is removed as appropriate.
- Scene Editing and Navigation: The editor is directly tied to the project outline. You can swiftly jump between scenes by clicking different tree items, and the editor will switch to whatever content you selected. Each scene you add starts with a default placeholder text (e.g., “This is the scene content for [Scene Name].”) which you can overwrite. The editor features typical text-editing capabilities (cut, copy, paste, undo, etc., often accessible via right-click or keyboard shortcuts). It also continuously tracks word count – the status bar at the bottom shows the current scene’s word count and last save time, updating as you type. This helps you monitor your progress.

Focus Mode (Distraction-Free Writing): Need to concentrate on writing without any distractions? The program offers a Focus Mode, a full-screen writing environment designed to simulate a clean “paper-like” page over a background image. When you activate Focus Mode (via the toolbar’s fullscreen icon or by pressing F11), the interface will remove all toolbars, panels, and menus, presenting just your text on an unobtrusive backdrop.

- A4 Page Simulation: In Focus Mode, your text is centered on the screen in a fixed-size area that mimics a sheet of paper (approximately A4 dimensions). The page area usually has a semi-transparent or softly colored background (like a piece of paper overlaid on the background image) to give a comfortable contrast for your text. This creates the feeling of typing on a piece of paper, which many writers find helps them focus on the words, one page at a time.
- Custom Backgrounds: The full-screen background can display scenic or calming images to set the mood. The program comes with a set of background images that it will cycle through. You can press F12 in Focus Mode to switch to the next background image. For instance, you might write against a backdrop of a quiet beach, a mountain landscape, or a simple dark texture – whatever images are provided in the
assets/backgroundsfolder. The images scale to fill the screen, and your text remains centered in front. This visual ambiance aims to inspire creativity or at least make the blank page less intimidating. - Minimal Interface: Focus Mode runs the application in a frameless window that covers the entire screen. The usual menus and toolbars are hidden. A subtle benefit: this mode forces any notifications or other apps to stay out of sight, so you truly get a distraction-free session. When you’re done or want to exit, pressing F11 again or Escape will close Focus Mode and return you to the standard interface, with all your work saved in the scene as usual. (All changes you make in Focus Mode go right into the scene’s text – it’s the same editor content, just presented differently, so nothing is lost when switching back.)

AI-Powered Rewrite Feature: While writing or editing, you might find a sentence or paragraph that isn’t quite working. The program’s Rewrite tool lets you leverage AI to suggest alternative phrasings or improvements for selected text.

- How to Use Rewrite: Simply highlight the portion of text in the editor that you want to refine. Then right-click the selection and choose “Rewrite” from the context menu. (This option appears only if some text is selected.) The Rewrite command will open a special dialog box that offers AI-based rewriting suggestions for your selected text.
- Rewrite Dialog: In the rewrite dialog, you will see your original text displayed for reference and kept intact. There’s a dropdown menu labeled “Select Rewrite Prompt” which contains various rewriting styles or guidelines. For example, you might have prompts like “Simplify the language,” “Make it more descriptive,” or “Change to passive voice.” These prompts define how the AI should transform your text. Choose one that fits what you’re looking for. Then click the “Generate Rewrite” button to have the AI produce a rewritten version. The AI’s rewritten suggestion will appear in a “Rewritten Text” field below.
- Review and Apply: You can compare the AI’s rewritten text with your original. If you’re not satisfied, you can click “Generate” (or “Retry”) again to get a different take, perhaps refining it until it sounds right. Once you have a rewritten version you like, click “Apply”. This will close the dialog and replace the selected text in your scene with the AI’s new version. (If you decide not to use the AI suggestion, you can cancel and your text remains unchanged.) The rewrite feature is a handy way to get out of wording ruts – it provides quick, alternative phrasings while you retain full control. You decide if the suggestion is an improvement and whether to keep it. All rewriting is done in-place on your text, so you can continue editing normally after applying a change.
Overall, the writing environment combines a traditional rich-text editor (with formatting tools and an outline view) and modern conveniences (like Focus Mode for concentration and AI rewrites for polishing prose). It’s designed to be intuitive: you write and format in the main editor, organize with the tree, and optionally use Focus Mode or AI tools as you see fit, all within one program.
4. AI & Prompt Integration
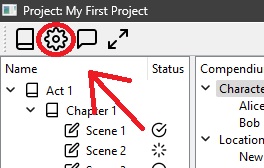
Configurable AI Prompts: The program includes AI-assisted writing features, and it gives you control over how the AI behaves through a Prompt Workshop. In the toolbar, clicking the Prompt Options icon (usually a gear or settings icon) opens the Prompts Window, where you can configure various AI prompt templates and settings. These prompts define instructions or styles for different tasks – for example, continuing your story’s prose, summarizing text, or engaging in a brainstorming chat. They are organized into categories: Workshop, Summary, Prose, and Rewrite. Each category holds one or more prompt presets.
- Prompt Editing: In the Prompts Window, you’ll see a list of prompt categories and their prompts (much like the compendium layout: a tree on the left and details on the right). You can select a prompt to view or edit its text – which is the actual instructions that will be sent to the AI – and associated settings like which AI model/provider to use, token limit, or temperature (creativity level). Default prompts (the ones that come built-in) might be read-only to prevent accidental modification, but you can convert them to custom prompts if needed (there’s an option “Convert to Custom” on default prompts to make them editable). You can also create new prompts: right-click on a category and choose “New Prompt”, then give it a name and write the instructions for the AI. For instance, you might add a custom Workshop prompt for the AI to role-play as a specific character when chatting, or a Prose prompt that enforces a certain writing style for generated text. All these prompt configurations are saved to a project-specific file so you can tailor AI assistance to your story’s needs.
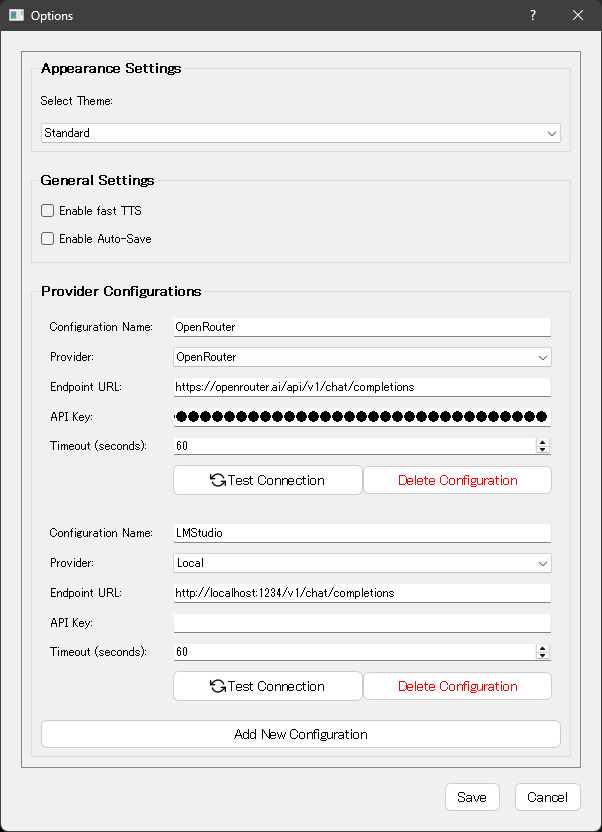
- LLM Provider Configuration: The AI features can work with different language model providers (local or online). Through the Options window (accessible via a main menu or toolbar), you can set up your AI provider credentials and preferences. For example, you might configure an OpenAI API key, or point to a local model. In the Options dialog’s Provider Configurations section, click “Add New Configuration” to enter details for a provider (like selecting OpenAI vs. local, providing an endpoint URL if needed, and an API key). You can save multiple configurations (say one for a local model and one for a cloud API) and enable/disable or remove them as needed. This setup ensures the AI features know which backend to use and how to connect. Once set, these configurations are utilized by the prompts (each prompt can specify which provider and model to use – e.g., a high-power model for final prose, a faster local model for quick brainstorming).

Workshop Chat (Brainstorming with AI): The Workshop Window is a dedicated chat-like interface where you can converse with an AI assistant. It’s great for brainstorming ideas, developing plot points, or even role-playing dialogues with your characters. You open the Workshop via the toolbar (chat bubble icon), and it appears as a separate window or pane.
- Chat Interface: In the Workshop, the screen is split into two main parts. On the left, you have a list of conversation threads (each representing a separate chat session, so you can have multiple ongoing topics). On the right, you have the actual chat log and input field. You can select a conversation from the list to view its messages in the chat log. To start a new chat session, click the “New Chat” button; this creates a fresh empty conversation (e.g., “Chat 2” if “Chat 1” exists) where you can begin talking to the AI without context from previous chats.
- Sending Messages: At the bottom of the chat panel is a text box where you type your message or question to the AI. When ready, click the Send button (represented by a paper plane/send icon) to submit it. The AI’s reply will appear in the chat log above, in a threaded format like a messaging app. The chat log is read-only for past messages (so you see the history but type new messages in the input box). You can carry on a back-and-forth dialog with the AI, asking for ideas, clarifications, or even have it generate some dialogue or content in a conversational manner. The program handles formatting the prompt behind the scenes, potentially including context like the current conversation history or selected compendium info (if context mode is on).
- Workshop Prompts and Modes: At the top of the chat input area, there are a couple of controls to customize the AI’s behavior for the workshop. One is a Prompt Selector dropdown containing different Workshop prompt presets. These correspond to the Workshop prompts defined in your Prompt Options. For example, you might have a “Brainstorm Ideas” prompt vs. a “In-world Dialogue” prompt – selecting one will change how the AI responds. The selected prompt’s configuration (like which model it uses) is shown next to it (the “Model: [Name]” label updates accordingly). Another control is a Mode selector (maybe labeled Normal/Economy/Ultra-Light), which might adjust the level of detail or token usage (for instance, an Economy mode might use shorter replies to save tokens). By switching modes, you can manage the balance between thoroughness and speed/cost in the AI’s answers.
- Contextual AI Assistance: In the Workshop chat, you also have an option to toggle the Context Panel. When enabled, this panel (often appearing to the right side within the Workshop window) shows your project’s tree and compendium simultaneously. This allows you to quickly pick relevant context – for example, you can click a particular scene or a compendium entry, and the program will include that information in your next AI query. Essentially, it helps the AI “remember” specific details from your story while you chat. This is particularly useful if you’re asking the AI to write a continuation or elaborate on something in your story; you can ensure it has the necessary background. The program can also automatically limit context to avoid exceeding token limits, summarizing or pruning conversation history when it gets too long.
Please scroll down to the end of this article to find a FAQ that explains the “chat fidelity modes”.
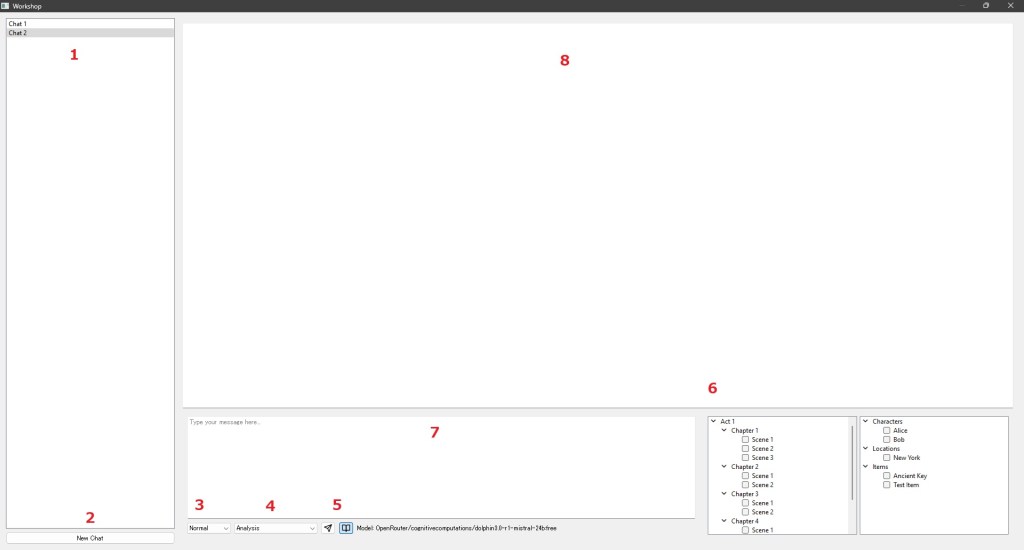
1: your chats, 2: save current chat and start a new one, 3: select “fidelity” mode, 4: select workshop chat prompt, 5: buttons to send and open the context panel, 6: select what context the chat should have, 7: type here, 8: chat history
In-Editor AI Assistance: Outside of the Workshop chat, the program’s AI integration also supports your actual drafting process. The Prose category prompts are used for story writing assistance – for instance, an AI “continue writing” feature. While not explicitly a button in the interface we described, you might encounter features like auto-generating the next paragraph or summarizing a chapter. These would use the templates from the Prose or Summary prompts categories and the configured AI model to produce text that you can insert into your manuscript.
- For example, a Summarize Scene function (perhaps under a menu) could use a Summary prompt to have the AI generate a synopsis of the current scene for you. Similarly, a Continue Story function might take the last part of your scene and, using a Prose prompt, ask the AI to draft the next few sentences or paragraphs. Any such generated text would appear either directly in the editor or in a preview for you to accept. The key point is that you have pre-defined control over how the AI generates this content (through those prompt templates you can edit). This ensures the AI’s output stays in line with your desired style and the story’s needs.
- The Rewrite feature we discussed in the Writing Environment section is another example of AI prompt integration. It specifically uses prompts from the Rewrite category of your prompt settings. You can customize or add rewrite styles in the Prompt Options window. Whatever options you have there will populate the dropdown in the Rewrite dialog, so you can fine-tune what kind of rewrites are available (tone, style, detail level, etc.).
In summary, the program’s AI integration is two-fold: a Workshop mode for free-form chatting and brainstorming with flexible context, and Direct writing aids (like rewrite, summarize, or continue) that plug into your editor. Both are highly configurable. By setting up prompt templates and LLM (Large Language Model) options to your liking, you can make the AI a helpful creative partner – whether you need an idea-generating collaborator or a quick way to polish your prose – all while staying within the same writing app.
5. Customization & Settings
Themes and Appearance: To make long writing sessions more comfortable, the software allows you to change its visual theme. In the Options or Settings window, there is an Appearance Settings section where you can select a Theme from a dropdown list. Themes can dramatically change the look and feel of the application – for example, a Night Mode theme offers a dark background with light text (easier on the eyes in low light), whereas a Sepia or Paper White theme might give the editor a paper-like off-white background with brown or black text for a classic look. There are several themes available by default (Standard, Night Mode, etc.). Selecting a theme immediately applies a new stylesheet to the entire application, so panels, text areas, and buttons change colors accordingly. You can switch themes at any time if you want to try a different vibe. The theme choice is saved in your settings, so the next time you open the program, it remembers which theme you last used.

Settings and Preferences: The Options window contains various other settings to tailor the program to your workflow:
- Auto-Save: You can enable or disable an auto-save feature for your writing. There’s a checkbox for “Enable Auto-Save” in the General Settings section. If enabled, the program will periodically save the current scene’s content in the background (for example, every few minutes) to protect against crashes or accidental loss. Auto-saves typically go to a special folder and the latest version can be loaded if needed (the program also loads the latest auto-saved text for a scene when you switch to it, if that auto-save is newer than the last manual save). If you prefer to manually control saving, you can leave this off and use the Save action (there’s usually a manual save button in the editor toolbar as well) whenever you want to save the scene to file.
- Text-to-Speech (TTS): There is an option labeled “Enable fast TTS”. If enabled, the program uses a faster voice or adjust the reading speed. The editor toolbar has a TTS button (speaker icon) to play the current scene’s text aloud for you. TTS can help in proofreading; hearing your story can reveal issues you might not catch by reading silently. The preference in settings ensures TTS uses your desired speed or engine.
- Other Preferences: The Options window likely includes other general settings, such as default directories, whether to show certain panels on startup, etc. One notable configuration is LLM (AI) Provider settings, which we discussed earlier. All the provider configurations (API keys, endpoints, etc.) you add are listed here, and you can remove or add as needed. You might also find settings for backup frequency, performance tweaks, or anything else the developers included to customize how the app runs.
Saving and Loading Settings: When you click Save in the Options dialog, all your preferences (theme choice, auto-save on/off, TTS enabled, and any AI provider configs) are saved to a settings file on disk. The program immediately applies some changes (like theme) upon saving, and will load all settings next time you launch the application. On startup, the app reads the settings file to restore your preferences automatically. This means your chosen theme, whether auto-save was on, and any configured AI keys/models persist between sessions – you don’t have to reconfigure each time. Additionally, the application window will remember its last size and position, and the last opened project’s state so that the workspace feels familiar when you return.
Theme Manager: Under the hood, a ThemeManager component handles the details of switching themes. It defines the styles for each theme (colors for background, text, buttons, etc.) and knows which themes are available. When you select a theme, the ThemeManager applies the corresponding style sheet across the whole app’s UI elements. This is why changing the theme is just one click and affects everything. The program includes a set of pre-made themes, but advanced users could theoretically add their own by editing the themes definition (though the interface doesn’t expose creating new themes directly, you are limited to the provided list from ThemeManager.list_themes()).
In conclusion, the creative writing program is highly customizable and user-friendly. It provides a robust structure for organizing your manuscript, tools for maintaining a rich world and context, a comfortable writing interface with focus and formatting options, AI helpers that you can tweak and guide, and settings to adapt the software to your personal preferences. All these features work together to let you concentrate on crafting your story, while the software supports and enhances your creative process at every step.
FAQ: Chat Fidelity Modes
What are “Chat Fidelity” modes? Chat Fidelity modes control how detailed or concise your chat history is when interacting with the application. They determine how much context is preserved or compressed to help the AI understand and respond effectively.
Why does Chat Fidelity matter for creative writing? Creative writing often relies heavily on context and detail. Higher fidelity preserves more detail, helping maintain consistency and depth, while lower fidelity condenses the history, focusing on key points to avoid confusion or token overflow.
What are the available Chat Fidelity modes?
- High Fidelity: Preserves almost the entire chat history in detail. Ideal for complex narratives or when precise context is crucial.
- Balanced Fidelity: Strikes a compromise between detail and brevity, summarizing less important details while keeping critical context intact.
- Compressed Fidelity: Aggressively condenses the conversation history, retaining only the most essential points. Suitable when clarity and brevity are prioritized over detail.
When should I choose High Fidelity? Select High Fidelity when your story or project requires intricate context retention, such as detailed world-building, character interactions, or long-term plot development.
When is Balanced Fidelity the best choice? Balanced Fidelity is best when you want a consistent understanding of your narrative without overwhelming the AI with too much detail. It’s effective for regular writing tasks that benefit from moderate context.
Why would I choose Compressed Fidelity? Compressed Fidelity is helpful when working with limited token capacities or when you need clear, concise prompts and responses. It’s ideal for quick brainstorming or simplified interactions.
How does the application decide what to keep or compress? The application analyzes your chat history, preserving messages marked as important or protected (e.g., texts wrapped in asterisks), and summarizes or removes less critical content based on the fidelity mode selected.
Can I mark important details to prevent compression? Yes. If you want to ensure specific details remain intact, wrap that text in asterisks *like this*, signalling the application to preserve that information regardless of the chosen fidelity mode.

Very cool project! I have it running, however whenever I try to save something in the Compendium I get the following error:
Failed to save compendium data: ‘QTreeWidgetItem’ object has no attribute ‘topLevelItem’
Any ideas?
LikeLike
Hello Mr. Omukai:
I just installed Writingway. Thank you for all your hard work. I’m still learning how to use the app. Could you tell me how to export, or compile my novel when I’m ready to print it?
LikeLike